So if you open a Microsoft Word document and the page is either much smaller or larger, or you don’t see the page breaks that you are accustomed to, then you might find it a little offputting. Fortunately, you can get your Word document back to normal view by changing a setting on the View tab.
How Do I Get My Word Document Back to Normal View?
Our guide continues below with additional information to answer the question of how do I get my Word document back to normal view, including pictures of these steps. Word 2010 has a bunch of different settings and view panels that you can choose from. They are helpful when you need to view atypical items, such as formatting marks and assorted breaks. However, if you forget to exit the view that you switched to, or if someone else was using your computer and changed the view, then you may be confused about how to return to the normal view in Word 2010. Fortunately, Word 2010 has a separate menu where you can specify most of your desired view settings, as well as return to the normal view to which you are accustomed.
Exiting Draft View in Word 2010 (Guide with Pictures)
If your Word 2010 view window is just displaying a giant white canvas with no page breaks in any direction, then you are probably in Draft view. This view has its uses in certain situations but, for the regular user that is just trying to create a normal document, the absence of separated pages can be a bit jarring. Fortunately, you can switch from this view and return to the default view that you want.
Step 1: Open the Word 2010 window where your document is currently displayed incorrectly.
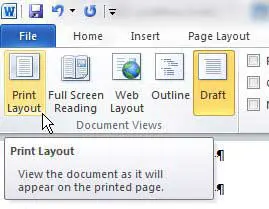
Step 2: Click the View tab at the top of the window.
Step 3: Click the Print Layout view in the Document Views section of the ribbon at the top of the window.
Now that you have answered the question of how do I get my Word document back to normal view you will be able to switch back and forth between different document views so that you are always using the one that is most useful for your current situation. The Print Layout view is the one that is the default for most Word 2010 situations, but you can also choose from the other options in the Document Views section to see if you prefer one of those options instead.
More Information on How to Get Microsoft Word Back to Normal View
While this article was written specifically for Microsoft Word 2010, it will also work in most newer versions of Word, such as Word 2016, or Word for Office 365. The different view options that you will find in Microsoft Word include:
Read Mode Print Layout Web Layout Outline Draft
Each of these different view options have their own uses, but the default settings will have MS Word open in Print Layout view. It’s called Print Layout view because it is how your document will look when you print it on a sheet of paper. While the Print Layout view is the view shown by default in most versions of Microsoft Word, all the options for the view settings can be useful depending on what you are trying to do.
Additional Sources
How to insert a check mark in Microsoft Word How to do small caps in Microsoft Word How to center text in Microsoft Word How to merge cells in Microsoft Word tables How to insert a square root symbol in Microsoft Word
These view options can offer some added utility so that you can focus on specific things, or see how your document will look when it’s viewed or used in specific situations. But the default view option for the Normal template in Microsoft Word is “print Layout”, and it’s the one that people usually think of when they consider the default layout in Word. You can reset MS Word to this view by selecting the View tab at the top of the window, then clicking the Print Layout button in the Views group on the ribbon. This mode has only view icons like: – File tab– Tools tab– View tab– Document name To exit this mode you can click the View tab at the top of the window and choose the Edit Document option from the drop down menu. Alternatively, you could click the Print Layout button in the status bar at the bottom right corner of the window. But the most common view mode in the Word program is called “Print Layout.” This is the mode where you can see the outline of your page, and the page view is similar to what you would see if you were to open Print Preview. You can always return to the regular view by selecting the View tab at the top of the window and clicking the Print Layout button. If your current document view doesn’t have all of the things that you would see in the normal view, such as the Review tab or the Layout tab, then you might be in one of the view modes where you can’t view ribbon options. If so, you can either select the Print Layout button in the horizontal status bar at the bottom of the window, or you can click the View tab at the top of the window and choose the Edit Document option. If you select the View tab at the top of the window you will see a Zoom group in the ribbon. You can select either the 100% option or the One Page option, which will switch the view back so that only one page of your document is on the screen at one time. After receiving his Bachelor’s and Master’s degrees in Computer Science he spent several years working in IT management for small businesses. However, he now works full time writing content online and creating websites. His main writing topics include iPhones, Microsoft Office, Google Apps, Android, and Photoshop, but he has also written about many other tech topics as well. Read his full bio here.