After using your Windows 7 computer for a significant amount of time, it is likely that you will have accumulated a large number of files. These can be scattered throughout various locations on your computer, such as your Document, Pictures, and Videos folders, as well as your Desktop. But as the number of files grows, it can be difficult to find what you are looking for. When you have a large number of files in one location, especially the desktop, it can start to get very difficult to find the things you need. You can create a new Windows 7 folder by right-clicking on the desktop, choosing New, then Folder, then giving the folder a name, and pressing Enter on your keyboard. Now you can start copying and pasting or dragging files and other folders into that new folder the same way that you would with any other folder on your computer. One way to improve your file organization is with the use of folders. You can create a folder in almost any location in Windows 7, which will allow you to place related files within that folder so that they are easier to find.
How to Create a Folder on Desktop in Windows 7
Our guide continues below with additional information on making a folder on desktop, including pictures of these steps.
Creating a New Folder on the Windows 7 Desktop (Guide with Pictures)
The steps in this guide will show you how to create and name a new folder on your Windows 7 Desktop. However, you can use this same method to create a new folder in other locations on your computer as well, such as your Documents folder, your Pictures folder, or any other folder where you would like to add another level of organization.
Step 1: Navigate to your computer Desktop.
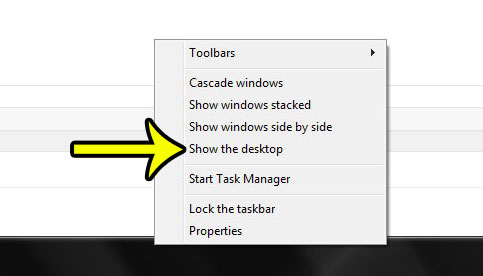
You can do this by closing or minimizing each open window, or by right-clicking the taskbar and selecting the Show the desktop option.
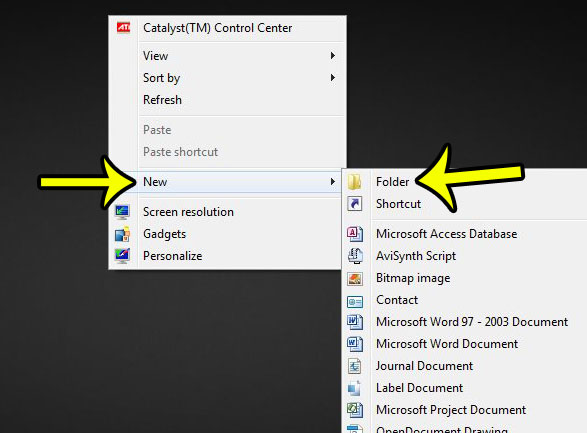
Step 2: Right-click in an open spot on the Desktop, click New, then click Folder.
There should now be a folder on your desktop with the label New folder.
Step 3: Start typing a name for the folder to replace the default name with one that is more useful for the types of files that you will be adding to the folder. Press the Enter key on your keyboard to apply the new folder name.
Our tutorial continues below with additional discussion about making new folders on your desktop, or any other location on your Windows 7 computer.
More Information on How to Make a Folder on a Computer
While the steps in this article have focused on making a new folder on your desktop in Windows 7, you can use the same idea to create a folder in most other locations, too. When you have a folder open you see a window that lists all of the files and folders inside of that one. This window is called File Explorer or Windows Explorer, and it’s a very useful thing to familiarize yourself with. In addition to right-clicking on an empty space inside of a File Explorer window and creating a folder that way, you can also click the New button in the menu bar at the top of the window and select the Folder option from there. The same methods that you use to create a folder in Windows 7 will work in other Windows operating systems as well, such as Windows 11 and Windows 10. If you decide that you want to change the name of the folder, then you can do so by clicking the folder once to select it, then pressing the F2 key at the top of your keyboard. If you are having difficulty with the way that files or folders are displayed on your Windows 7 computer, then learn about some of the more important Windows 7 file and folder options. These tips can be beneficial when you are having issues related to hidden files or file extensions.
Additional Reading
He specializes in writing content about iPhones, Android devices, Microsoft Office, and many other popular applications and devices. Read his full bio here.


