Like the rest of the programs in the Microsoft Office suite, such as Microsoft Word, Excel uses a ruler that allows you to specify the size of margins. The default unit of measurement will vary depending upon your location, but for many people, it is set to use inches. If you are not comfortable with inches as a unit of measurement, or if you prefer centimeters, however, you can adjust the settings in Excel 2013 to use that unit of measurement instead. Simply follow the steps below to learn how.
How to Change the Unit of Measurement in Excel 2013
Our article continues below with additional information on changing from inches to centimeters in Excel, including pictures of these steps. Our tutorial on how to convert mm to inches in Excel can show you another way to get this information as well.
How to Change the Ruler from IN to CM in Excel 2013 (Guide with Pictures)
Note that changing the default unit of measurement is also going to apply in some other locations as well, such as page size. It will not, however, convert any values that you enter into your cells.
Step 1: Launch Excel 2013.
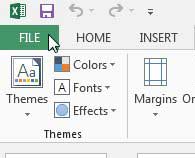
Step 2: Click the File tab at the top-left corner of the window.
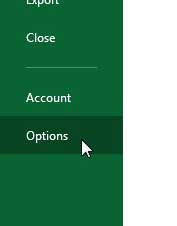
Step 3: Click Options at the bottom of the column on the left side of the window.
This is going to open a new Excel Options window.
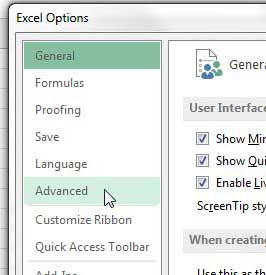
Step 4: Click the Advanced tab on the left side of the Excel Options window.
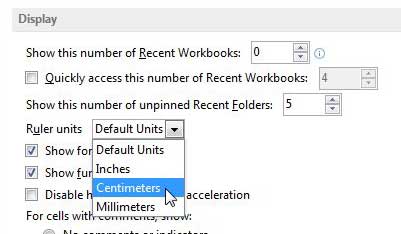
Step 5: Scroll down to the Display section of the window, click the drop-down menu to the right of Ruler Units, and select the Centimeters option.
Step 6: Click the OK button at the bottom of the window to apply your changes and close this window.
Now that you know how to change the ruler from inches to centimeters, you could also do the reverse and switch from Excel cm to inches for the ruler instead. You can also learn how to change the default file format to .xls in Excel 2013 if you need to use that file format more often.
The Difference Between Page Layout View and Normal View
When you create a new workbook in Microsoft Excel, it will probably open in Normal view by default. However, this is not ideal when the appearance of your document is important for how that document will print. When you would like to see the measurement units on the ruler, then Page Layout view is far more useful. Additionally, if you are trying to set the column width or row height in a measurement of unit other than the confusing point option, then Page Layout view will let you do so. You can switch between views on the View tab, but you can also change the default view for new workbooks by going to File > Options > General > and selecting the desired option next to Default view for new sheets.
More Information on How to Change Ruler from Inches to Centimeters in Excel
If you aren’t seeing the rulers at the left and top of the window, then it might be because of the view that you are currently using in Excel. You can switch to the Page Layout view by selecting the View tab at the top of the window, then clicking the Page Layout button. These same steps will work in other versions of Excel as well, including Excel 2016 and Excel for Office 365. The available options when selecting your unit of measurement for the ruler are:
Default units (this is the unit of measurement that is used by your current geographic location)InchesCentimetersMilimeters
If you have data entered into your cells that is in inches, you can use a formula to convert inches to centimeters in Excel. That formula is: =CONVERT(XX, “IN”, “CM”) You would need to replace the “XX” part of that formula with the cell location of the data that you would like to convert. You can also use this same formula to make other unit conversions, too. You would just need to replace the different unit abbreviations with the desired units. For example, an Excel cm to inches conversion would look like =CONVERT(XX, “CM”, “IN”). One other setting that you may want to change is the horizontal and vertical centering of your printed data. You can do this by selecting the Page Layout tab at the top of the window, then clicking the small Page Setup button at the bottom-right of the Page Setup group in the ribbon. You can then click the Margins tab and select whether you would like to center the page horizontally or vertically.
Additional Sources
After receiving his Bachelor’s and Master’s degrees in Computer Science he spent several years working in IT management for small businesses. However, he now works full time writing content online and creating websites. His main writing topics include iPhones, Microsoft Office, Google Apps, Android, and Photoshop, but he has also written about many other tech topics as well. Read his full bio here.
You may opt out at any time. Read our Privacy Policy


